了解
什么是 SphereEx-Boot
SphereEx-Boot 工具是一款基于 Python 开发的用于方便管理 ShardingSphere-Proxy 集群的命令行工具。 SphereEx-Boot 主要功能是对 ShardingSphere-Proxy 进行安装、启动、停止、查看运行状态、卸载等操作。
名词解释
- 主控机: 安装 SphereEx-Boot 工具的物理机称为主控机。
- 部署机: 安装 ShardingSphere-Proxy、ZooKeeper 的物理机称为部署机。
产品优势
快速上手
快速上手体验 ShardingSphere-Proxy。 要上手 ShardingSphere-Proxy ,你将使用到 SphereEx-Boot 工具,即 Apache ShardingSphere 生态系统中的一个集群管理工具。通过 SphereEx-Boot 工具,只需执行一行命令就可运行任意 ShardingSphere-Proxy 集群组件。
易运维
SphereEx-Boot 工具可以快速安装,快速部署 ShardingSphere-Proxy 集群。对 ShardingSphere-Proxy 集群进行相关管理,降低运维成本。
易扩展
提供标准化的水平扩展功能,可通过增加数据服务器的数量可以随时随地动态的对集群进行扩容。
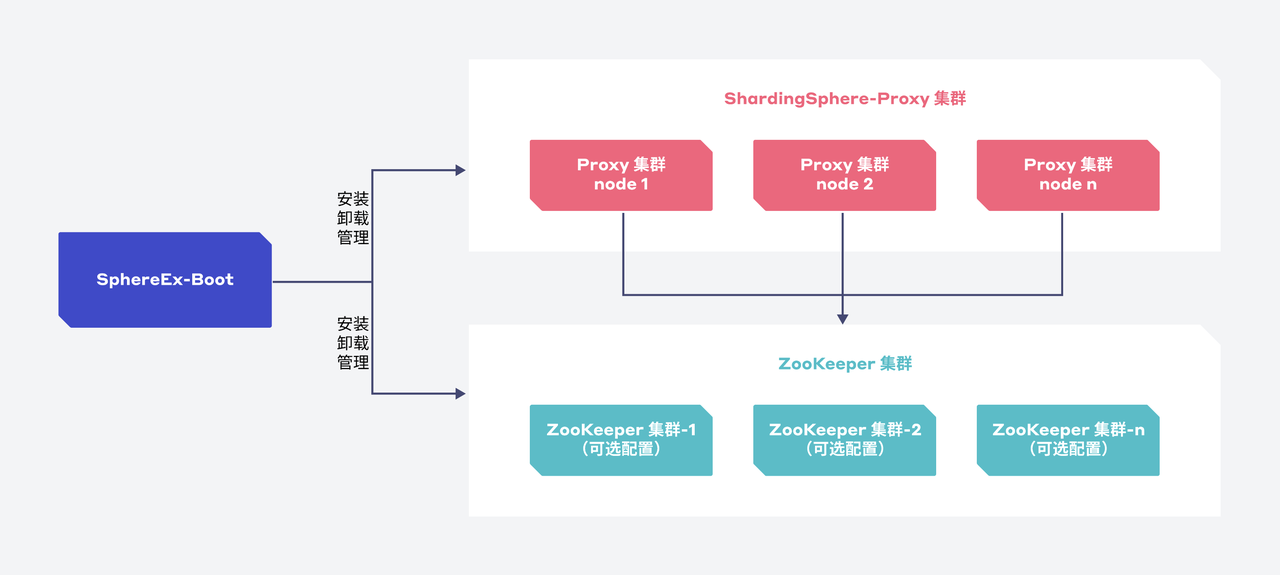
逻辑架构
资源需求
服务器建议配置:
| 名称 | CPU | 内存 | 硬盘容量 |
|---|---|---|---|
| SphereEx-Boot工具服务器 | 4 核+ | 8 G+ | 50 G+ |
| ShardingSphere-Proxy | 8 核+ | 16 G+ | 200 G+ |
| ZooKeeper | 8 核+ | 16 G+ | 200 G+ |
端口说明:
| 服务器 | 默认端口 | 端口说明 |
|---|---|---|
| SphereEx-Boot | 22 | SSH 通信端口 |
| ShardingSphere-Proxy | 3307 | ShardingSphere-Proxy 启动端口 |
| ZooKeeper | 2181 | ZooKeeper启动端口 |
快速入门
本节介绍如何安装和使用 SphereEx-Boot 工具。
安装准备
操作系统
SphereEx-Boot 工具所在的主控机和 ShardingSphere-Proxy 所在的部署机目前支持的操作系统有 Linux 主流发行系统(如 CentOS 7.x、Ubuntu 16+ 等)。
说明:可以执行命令 cat /proc/version 查看当前操作系统版本信息。
主控机
确保主控机安装了如下软件:
- sshpass 1.0.0+
- Python 2.7 或者 Python 3.5+
- pip 20.0.0+
- JDK 1.8+
部署机
确保部署机安装了如下软件:
- sshpass 1.0.0+
- Python 2.7 或者 Python 3.5+
- JDK 1.8+
安装 SphereEx-Boot
在线安装 SphereEx-Boot
执行下面命令,安装 SphereEx-Boot。
Bash$ curl -sSL https://download.sphere-ex.com/boot/install.sh | bash ############################################# 100.0% Processing ./spex-0.1.0.tar.gz Preparing metadata (setup.py) ... done …… Successfully install spex.....
离线安装 SphereEx-Boot
下载 SphereEx-Boot 工具安装包,下载后执行下面命令安装。
Bash$ pip install spex-0.1.0.tar.gz
如果没有安装 pip 时,可以解压 spex-0.1.0.tar.gz 安装包,然后进入到解压目录执行如下命令安装。
Bash$ python setup.py install
查看 SphereEx-Boot 安装结果
执行 spex --help 命令查看是否有如下输出,如果有说明安装成功。
Bash$ spex --help Usage: spex [OPTIONS] COMMAND [ARGS]... Spex is a command line management tool for managing ShardingSphere-Proxy clusters Options: --version Version of spex --help Show this message and exit. Commands: cluster Cluster management, such as install, start, stop and uninstall config Cluster configuration management
快速搭建示例集群
这部分指导用户如何使用 SphereEx-Boot 快速建立一个本地示例集群。
服务器规划
- 部署机IP:127.0.0.1
- 登录账号:root
- 密码:root
说明:操作时需要替换为自己的 IP 地址、登录账号和密码。
前提条件
主控机和部署机需要通过 sshpass 进行 SSH 账号密码登录互信授权。
验证主控机是否可以使用账号和密码登录到部署机。
Bash$ ssh root@127.0.0.1 [root@centos71 .ssh]# ssh root@127.0.0.1 Last login: Tue Dec 21 15:33:32 2021 from 127.0.0.1
操作步骤
- 创建名为 demo 的集群。
Bash$ mkdir demo $ cd demo $ spex cluster init --name demo --download all $ ls -l total 126672 -rw-r--r-- 1 spex-demo 48M 12 9 14:46 apache-shardingsphere-5.0.0-shardingsphere-proxy-bin.tar.gz -rw-r--r-- 1 spex-demo 12M 12 9 14:46 apache-zookeeper-3.6.3-bin.tar.gz -rw-r--r-- 1 spex-demo 741B 12 9 14:47 cluster-config.yaml drwxr-xr-x 9 spex-demo 288B 12 9 14:54 conf -rw-r--r-- 1 spex-demo 984K 12 9 14:47 mysql-connector-java-5.1.47.jar -rw-r--r-- 1 spex-demo 1.1K 12 9 14:47 zoo.cfg
- 添加集群配置文件到 SphereEx-Boot 工具管理环境。
Bash$ spex config add -f cluster-config.yaml
- 安装 demo 集群。
Bash$ spex cluster install --name demo Operation ShardingSphere-Proxy check proxy install dir exist! Completed....... Operation ShardingSphere-Proxy create install directory 127.0.0.1 : 3307 => success install proxy 127.0.0.1 : 3307 => success copying shell file 127.0.0.1 : 3307 => success copying config file 127.0.0.1 : 3307 => success copying agent config file skipped host:127.0.0.1 item : None copying depend file 127.0.0.1 : 3307 => success Completed......
- 启动 demo 集群。
Bash$ spex cluster start --name demo Operation ShardingSphere-Proxy start proxy 127.0.0.1 : 3307 => success The port is 3307 The classpath is /root/shardingsphere-proxy/apache-shardingsphere-5.0.0-shardingsphere-proxy-bin/conf:.:/root/sharding-proxy/apache-shardingsphere-5.0.0-shardingsphere-proxy-bin/lib/*:/root/sharding-proxy/apache-shardingsphere-5.0.0-shardingsphere-proxy-bin/ext-lib/* Please check the STDOUT file: /root/sharding-proxy/apache-shardingsphere-5.0.0-shardingsphere-proxy-bin/logs/stdout.log Completed......
- 查看 demo 集群运行状态。
Bash$ spex cluster status --name demo Operation ShardingSphere-Proxy proxy status 127.0.0.1 : 3307 => success PID:6355 PORT:3307 %CPU:20.6 %MEM:10.1 START:00:33 TIME:0:03 Results summary +--------------+------+------+------+------+-------+------+ | HOST | PORT | PID | %CPU | %MEM | START | TIME | +--------------+------+------+------+------+-------+------+ | 127.0.0.1 | 3307 | 6355 | 20.6 | 10.1 | 00:33 | 0:03 | +--------------+------+------+------+------+-------+------+ Completed...... Operation ZooKeeper zookeeper status 127.0.0.1 : 2181 => success /usr/bin/java Client port found: 2181. Client address: localhost. Client SSL: false. Mode: standalone ZooKeeper JMX enabled by default Using config: /root/zookeeper/apache-zookeeper-3.6.3-bin/bin/../conf/zoo.cfg Results summary +--------------+------+------------------+ | HOST | PORT | STATUS | +--------------+------+------------------+ | 127.0.0.1 | 2181 | Mode: standalone | +--------------+------+------------------+ Completed......
- 卸载 demo 集群。
当用户需要卸载安装的 demo 集群时,执行命令 $ spex cluster uninstall --name demo 卸载相应的集群。
Bash$ spex cluster uninstall --name demo Are you sure to uninstall demo cluster ? [y/N]: y Operation ShardingSphere-Proxy stop proxy 127.0.0.1 : 3307 => success ShardingSphere-Proxy does not started! remove install directory 127.0.0.1 : 3307 => success Completed...... Operation ZooKeeper stop zookeeper 127.0.0.1 : 2181 => success /usr/bin/java Stopping zookeeper ... no zookeeper to stop (could not find file /root/zookeeper/data/zookeeper_server.pid) ZooKeeper JMX enabled by default Using config: /root/zookeeper/apache-zookeeper-3.6.3-bin/bin/../conf/zoo.cfg remove zookeeper data directory 127.0.0.1 : 2181 => success remove zookeeper install directory 127.0.0.1 : 2181 => success Completed......
卸载 SphereEx-Boot
当需要删除或卸载现有 SphereEx-Boot 时,参考如下操作即可。
执行 pip uninstall spex 命令卸载 SphereEx-Boot。
Bash$ pip uninstall spex Found existing installation: spex 0.1.0 Uninstalling spex-0.1.0: Would remove: /usr/local/bin/spex /usr/local/lib/python3.6/site-packages/spex-0.1.0-py3.6.egg-info /usr/local/lib/python3.6/site-packages/src/* Proceed (Y/n)? y Successfully uninstalled spex-0.1.0
用户指南
简介
SphereEx-Boot 工具是一款基于 Pyhton 开发的命令行工具。主要功能是对 ShardingSphere-Proxy 进行安装部署,可以对 ShardingSphere-Proxy 进行安装、启动、停止、查看运行状态、卸载等操作。安装 SphereEx-Boot 工具的物理机称为主控机,安装 ShardingSphere-Proxy 的物理机称为部署机。SphereEx-Boot 工具目前支持主流 Linux 系统运行。
环境准备
主控机软件配置
| 软件 |
|---|
| sshpass 1.0+ |
| Python 2.7 / Python 3.5+ |
| pip 20.0.0+ |
| JDK 1.8+ |
部署机软件配置
| 软件 |
|---|
| sshpass 1.0+ |
| Python 2.7 / Python 3.5+ |
| JDK 1.8+ |
安装 SphereEx-Boot
在线安装 SphereEx-Boot
- 执行命令
curl -sSL https://download.sphere-ex.com/boot/install.sh | bash安装 SphereEx-Boot。
[root@centos71 ~]# curl -sSL https://download.sphere-ex.com/boot/install.sh | bash
############################################# 100.0%
Processing ./spex-0.1.0.tar.gz
 Preparing metadata (setup.py) ... done
……
Successfully install spex.....
离线安装 SphereEx-Boot
1.从路径 https://download.sphere-ex.com/boot/spex-0.1.0.tar.gz 下载 SphereEx-Boot 工具安装包,下载后执行下面命令安装。
[root@centos71 ~]# pip install spex-0.1.0.tar.gz
Preparing metadata (setup.py) ... done
Requirement already satisfied: ansible<=2.10.7,>=2.8.0 in /usr/local/lib/python3.6/site-packages (from spex==0.1.0) (2.10.7)
……
Installing collected packages: spex
  Attempting uninstall: spex
    Found existing installation: spex 0.1.0
    Uninstalling spex-0.1.0:
      Successfully uninstalled spex-0.1.0
    Running setup.py install for spex ... done
Successfully installed spex-0.1.0
2.安装后执行命令 spex --version 可以查看版本号。
[root@centos71 ~]# pip --version
pip 21.3.1 from /usr/local/lib/python3.6/site-packages/pip (python 3.6)
查看 SphereEx-Boot 帮助
- 可以使用 --help 参数查看 SphereEx-Boot 命令和子命令参数帮助信息。
- 示例: 查看 SphereEx-Boot 命令帮助。
[root@centos71 demo]# spex --help
Usage: spex [OPTIONS] COMMAND [ARGS]...

 Spex is a command line management tool for managing ShardingSphere-Proxy
 clusters

Options:
 --version Version of spex
 --help   Show this message and exit.

Commands:
 cluster Cluster management, such as install, start, stop and uninstall
 config  Cluster configuration management
- 示例: 查看 SphereEx-Boot cluster 命令帮助信息。
[root@centos71 demo]# spex cluster --help
Usage: spex cluster [OPTIONS] COMMAND [ARGS]...

 Cluster management, such as install, start, stop and uninstall

Options:
 --help Show this message and exit.

Commands:
 download  Download ShardingSphere-Proxy, Zookeeper, Database driver...
 init    Quickly initialization a cluster configuration --proxy-host
       can...

 install  Install cluster of ShardingSphere-Proxy or zookeeper
 list    List already added clusters
 scale   Scale cluster of ShardingSphere-Proxy It can be scale out...
 start   Start cluster of ShardingSphere-Proxy or zookeeper
 status   Status cluster of ShardingSphere-Proxy or ZooKeeper
 stop    Stop cluster of ShardingSphere-Proxy or zookeeper
 uninstall Uninstall cluster of ShardingSphere-Proxy or zookeeper
- 示例: 查看 SphereEx-Boot config 命令帮助信息。
[root@centos71 demo]# spex config --help
Usage: spex config [OPTIONS] COMMAND [ARGS]...

 Cluster configuration management

Options:
 --help Show this message and exit.

Commands:
 add    Add cluster environment.
 check   Check the cluster configuration file you can use --file or...
 delete  Delete cluster configuration
 info   Show cluster configuration content
 template Show cluster configuration template.
使用 SphereEx-Boot
集群拓扑配置文件操作
集群拓扑配置文件说明
通过 SphereEx-Boot 部署集群时,需要提供一份 yaml 格式的集群拓扑配置文件,配置数据如下。
- cluster_name: 集群名字
- install_user: 登录部署机用户名
- install_password: 登录部署机用户密码
- proxy: ShardingSphere-Proxy 配置
- version: ShardingSphere-Proxy 版本标识
- file: 主控机 ShardingSphere-Proxy 安装包文件路径
- conf_dir:主控机 ShardingSphere-Proxy 业务配置文件目录
- depend_files:主控机 ShardingSphere-Proxy 驱动 jar 包文件路径
- install_dir:部署机 ShardingSphere-Proxy 部署目录
- port:部署机 ShardingSphere-Proxy 启动端口
- overwrite:如果部署机安装目录已经存在,是否重新安装。默认 true。
- servers: 部署机信息列表
- host:部署机 IP 地址
- port:部署机 ShardingSphere-Proxy 启动端口。(非必要,不配置时以 proxy 中配置为准)
- install_dir:部署机 ShardingSphere-Proxy 安装目录(非必要,不配置时以 proxy 中配置为准)
- agent_conf_file:主控机 ShardingSphere-Proxy 中 agent 配置文件路径(非必要,不配置时以 proxy 中配置为准)
- overwrite:如果部署机安装目录已经存在,是否重新安装,默认 true。(非必要,不配置时以 proxy 中配置为准)
- zookeeper:ZooKeeper 配置 (如果不需要 ZooKeeper 时可以不配置)
- version:ZooKeeper 版本标识
- file:主控机 ZooKeeper 安装文件路径
- conf_file:主控机 ZooKeeper zoo.cfg 配置文件路径
- install_dir:部署机 Zookeeper 安装目录
- data_dir:部署机 ZooKeeper 配置文件 zoo.cfg 中 dataDir 配置值
- port:部署机 ZooKeeper 启动端口
- overwrite:如果部署机安装目录已经存在,是否重新安装,默认 true。
- servers:ZooKeeper 部署机列表
- host:部署机 IP 地址
- myid:ZooKeeper 集群 myid 值
- port:部署机 ZooKeeper 启动端口(非必要,不配置时以 ZooKeeper 中配置为准)
- install_dir:部署机 ZooKeeper 安装目录(非必要,不配置时以 ZooKeeper 中配置为准)
- conf_file:主控机 Zookeeper zoo.cfg 配置文件路径(非必要,不配置时以 ZooKeeper 中配置为准)
- data_dir:部署机 ZooKeeper 配置文件 zoo.cfg 中 dataDir 配置值(非必要,不配置时以 ZooKeeper 中配置为准)
- overwrite:如果部署机安装目录已经存在,是否重新安装,默认 true。(非必要,不配置时以 ZooKeeper 中配置为准)
集群拓扑配置示例:
cluster_name: demo
install_user: root
install_password: 'root'

proxy:
  version: '5.0.0'
  install_dir: /opt/shardingsphere-proxy
  conf_dir: /root/demo/conf
  file: /root/demo/apache-shardingsphere-5.0.0-shardingsphere-proxy-bin.tar.gz
  depend_files:
   - /root/demo/mysql-connector-java-5.1.47.jar
  port: 3307
  overwrite: true
  servers:
   - host: 10.0.1.1

zookeeper:
  version: '3.6.3'
  install_dir: /opt/zookeeper
  data_dir: /tmp/zookeeper
  conf_file: /root/demo/zoo.cfg
  file: /root/demo/apache-zookeeper-3.6.3-bin.tar.gz
  port: 2181
  overwrite: true
  servers:
   - host: 10.0.1.1
     myid: 1
集群拓扑文件初始化
- 导出集群拓扑配置文件
- 执行下面命令在当前目录下生成名为 cluster-template.yaml 的集群拓扑文件模板。根据集群拓扑说明,配置自己实际配置数据。
$ spex config template --type full --output ./
- 初始化集群拓扑配置文件和内容,可以使用
spex cluster init命令。
检查集群拓扑文件
- 使用
spex config check -f <cluster-file>对指定的集群拓扑文件进行配置检查。
示例: 检查名为 cluster-template.yaml 的集群拓扑文件。
[root@centos71 demo]# spex config check -f cluster-config.yaml
Proxy are no errors
Zookeeper are no errors
添加集群拓扑信息
- 执行
spex config add命令添加集群拓扑配置文件到 SphereEx-Boot 管理。添加后 SphereEx-Boot 才可以通过集群名对集群进行相关管理。
[root@centos71 demo]# spex config add -f cluster-config.yaml
Successfully add cluster
查看已添加集群拓扑
- 执行
spex cluster list命令查看已经添加的集群拓扑。 当前存在两个集群拓扑,分别是 demo 和 demo1.
[root@centos71 demo]# spex cluster list
+--------------+
| Cluster Name |
+--------------+
|   demo   |
|  demo1   |
+--------------+
删除集群拓扑
- 使用
spex config delete <cluster-name>从 SphereEx-Boot 管理中移除指定集群拓扑, 不会影响部署机部署上的 ShardingSphere-Proxy、ZooKeeper。
示例: 移除名为 demo 的集群。
[root@centos71 demo]# spex config delete demo
Operation ShardingSphere-Proxy
check proxy install dir exist!
10.0.1.1 : 3307 /demo/shardingsphere-proxy is existence!
Completed......
Operation ZooKeeper
check ZooKeeper install dir exist!
10.0.1.1 : 2181 /demo/zookeeper/ is existence!
Completed......
Are you sure to delete configuration of demo? [y/N]: y
Completed.......
查看集群拓扑内容
1.使用命令 spex config info --name <cluster-name> 查看指定集群拓扑内容。
示例: 查看名为 demo 的集群拓扑内容。
[root@centos71 demo]# spex config info --name demo
proxy
+--------------+-------------+------+----------------------------+
| install_user |   host  | port |    install_dir     |
+--------------+-------------+------+----------------------------+
|   root   | 10.0.1.1 | 3307 | /demo/shardingsphere-proxy |
+--------------+-------------+------+----------------------------+
zookeeper
+--------------+-------------+------+------+------------------+----------------------+
| install_user |   host  | port | myid |  install_dir  |    data_dir    |
+--------------+-------------+------+------+------------------+----------------------+
|   root   | 10.0.1.1 | 2181 | 1  | /demo/zookeeper/ | /demo/zookeeper/data |
+--------------+-------------+------+------+------------------+----------------------+
2.使用 spex config info --name <cluster-name>--detail 查看指定集群拓扑详细配置内容。
[root@centos71 demo]# spex config info --name demo --detail
cluster_name: demo
install_user: root
install_password: root
proxy:
 version: '1.0'
 file: /root/demo/apache-shardingsphere-5.0.0-shardingsphere-proxy-bin.tar.gz
 conf_dir: /root/demo/conf
 agent_conf_file:
 depend_files:
 - /root/demo/mysql-connector-java-5.1.47.jar
 install_dir: /demo/shardingsphere-proxy
 port: 3307
 overwrite: false
 servers:
 - host: 10.0.1.1
zookeeper:
 version: '1.0'
 file: /root/demo/apache-zookeeper-3.6.3-bin.tar.gz
 conf_file: /root/demo/zoo.cfg
 install_dir: /demo/zookeeper/
 data_dir: /demo/zookeeper/data
 port: 2181
 overwrite: false
 servers:
 - host: 10.0.1.1
  myid: 1
安装集群
前提条件
主控机和部署机需要通过 sshpass 进行 SSH 账号密码登录互信授权。
环境准备
执行 spex cluster download 命令下载所有安装包,包括:
- ZooKeeper
- ShardingSphere-Proxy
- MySQL Driver
操作步骤
- 集群拓扑文件初始化,具体操作请参见“集群拓扑文件初始化”。
- 检查集群拓扑文件,具体操作请参见“检查集群拓扑文件”。
- 添加集群拓扑文件,具体操作请参见“添加集群拓扑信息”。
- 使用命令
spex cluster install --name <cluster-name>安装集群。
示例: 安装已添加的名为 demo 的集群。
[root@centos71 demo]# spex cluster install --name demo
Operation ShardingSphere-Proxy
check proxy install dir exist!
Completed......
Operation ShardingSphere-Proxy
create install directory
10.0.1.1 : 3307 => success
install proxy
10.0.1.1 : 3307 => success
copying shell file
10.0.1.1 : 3307 => success
copying config file
10.0.1.1 : 3307 => success
copying agent config file
skipped host : 10.0.1.1 item : None
copying depend file
10.0.1.1 : 3307 => success
Completed......
Operation ZooKeeper
check ZooKeeper install dir exist!
Completed......
Operation ZooKeeper
create ZooKeeper install directory
10.0.1.1 : 2181 => success
create ZooKeeper data directory
10.0.1.1 : 2181 => success
install ZooKeeper
10.0.1.1 : 2181 => success
10.0.1.1 : 2181 => success
create myid
10.0.1.1 : 2181 => success
Completed......
说明:
集群配置文件更新后,必须执行 spex config add 将新的集群拓扑配置文件信息更新到SphereEx-Boot ,才能继续安装。
启动集群
- 使用
spex cluster start --name <cluster-name>启动集群。
示例: 启动名为 demo 的集群。
[root@centos71 demo]# spex cluster start --name demo
Operation ZooKeeper
start ZooKeeper
10.0.1.1 : 2181 => success
/usr/bin/java
Starting zookeeper ... STARTED
ZooKeeper JMX enabled by default
Using config: /demo/zookeeper/apache-zookeeper-3.6.3-bin/bin/../conf/zoo.cfg
Completed......
Operation ShardingSphere-Proxy
start proxy
10.0.1.1 : 3307 => success
The port is 3307
The classpath is /demo/shardingsphere-proxy/apache-shardingsphere-5.0.0-shardingsphere-proxy-bin/conf:.:/demo1/shardingsphere-proxy/apache-shardingsphere-5.0.0-shardingsphere-proxy-bin/lib/*:/demo1/shardingsphere-proxy/apache-shardingsphere-5.0.0-shardingsphere-proxy-bin/ext-lib/*
Please check the STDOUT file: /demo/shardingsphere-proxy/apache-shardingsphere-5.0.0-shardingsphere-proxy-bin/logs/stdout.log
Completed......
查看集群状态
- 使用
spex cluster status --name <cluster-name>查看集群运行状态。
示例: 查看名为 demo 的集群运行状态。
[root@centos71 demo]# spex cluster status --name demo
Operation ShardingSphere-Proxy
proxy status
10.0.1.1 : 3307 => success
PID:14014 PORT:3307 %CPU:16.9 %MEM:0.2 START:12:05 TIME:0:01
Results summary
+-------------+------+-------+------+------+-------+------+
|   HOST  | PORT | PID | %CPU | %MEM | START | TIME |
+-------------+------+-------+------+------+-------+------+
| 10.0.1.1 | 3307 | 14014 | 16.9 | 0.2 | 12:05 | 0:01 |
+-------------+------+-------+------+------+-------+------+
Completed......
Operation ZooKeeper
ZooKeeper status
10.0.1.1 : 2181 => success
/usr/bin/java
Client port found: 2181. Client address: localhost. Client SSL: false.
Mode: standalone
ZooKeeper JMX enabled by default
Using config: /demo/zookeeper/apache-zookeeper-3.6.3-bin/bin/../conf/zoo.cfg
Results summary
+-------------+------+------------------+
|   HOST  | PORT |   STATUS   |
+-------------+------+------------------+
| 10.0.1.1 | 2181 | Mode: standalone |
+-------------+------+------------------+
Completed......
停止集群
- 使用
spex cluster stop --name <cluster-name>停止集群。
示例: 停止名为 demo 的集群。
[root@centos71 demo]# spex cluster stop --name demo
Operation ShardingSphere-Proxy
stop proxy
10.0.1.1 : 3307 => success
Stopping the ShardingSphere-Proxy
STOPED PID:9157 PORT:3307
Completed......
Operation ZooKeeper
stop ZooKeeper
10.0.1.1 : 2181 => success
/usr/bin/java
Stopping zookeeper ... STOPPED
ZooKeeper JMX enabled by default
Using config: /demo/zookeeper/apache-zookeeper-3.6.3-bin/bin/../conf/zoo.cfg
Completed......
卸载集群
- 使用命令
spex cluster uninstall --name <cluster-name>卸载集群,会删除掉部署机中部署目录。
示例: 卸载名为 demo 的集群。
[root@centos71 demo]# spex cluster uninstall --name demo
Are you sure to uninstall demo cluster ? [y/N]: y
Operation ShardingSphere-Proxy
stop proxy
10.0.1.1 : 3307 => success
Stopping the ShardingSphere-Proxy
STOPED PID:14014 PORT:3307
remove install directory
10.0.1.1 : 3307 => success
Completed......
Operation ZooKeeper
stop ZooKeeper
10.0.1.1 : 2181 => success
/usr/bin/java
Stopping zookeeper ... STOPPED
ZooKeeper JMX enabled by default
Using config: /demo/zookeeper/apache-zookeeper-3.6.3-bin/bin/../conf/zoo.cfg
remove ZooKeeper data directory
10.0.1.1 : 2181 => success
remove ZooKeeper install directory
10.0.1.1 : 2181 => success
Completed......
扩容集群
1.使用命令 spex cluster scale --name <cluster-name> --host <host-ip> 扩容集群。
示例: 在 demo 集群扩容 IP 为 10.0.1.2 的 ShardingSphere-Proxy 节点。
$ spex cluster scale --name demo --host 10.0.1.2
2.执行命令 spex cluster install -n demo --type proxy --host 10.0.1.2 安装新增节点 。
[root@community /]# spex cluster install -n demo --type proxy --host 10.0.1.2
ShardingSphere-Proxy
check proxy install dir exist!
Completed.......
ShardingSphere-Proxy
create install directory
10.0.1.2:3388 =>success
install proxy
10.0.1.2:3388 =>success
copying shell file
10.0.1.2:3388 =>success
copying config file
10.0.1.2:3388 =>success
copying agent config file
skipped host: 10.0.1.2 item:None
copying depend file
10.0.1.2:3388 =>success
Completed.......
3.执行命令 spex cluster start --name demo --type proxy --host 10.0.1.2 启动新增节点。
[root@community /]# spex cluster start --name demo --type proxy --host 10.0.1.2
ShardingSphere-Proxy
start proxy
10.0.1.2:3388 =>success
Starting the ShardingSphere-Proxy ...
The port is 3388
The classpath is /root/demo/apache-shardingsphere-5.0.0-shardingsphere-proxy-bin/conf:.:/root/demo/apache-shardingsphere-5.0.0-shardingsphere-proxy-bin/lib/*:/root/demo/apache-shardingsphere-5.0.0-shardingsphere-proxy-bin/ext-lib/*
Please check the STDOUT file: /root/demo/apache-shardingsphere-5.0.0-shardingsphere-proxy-bin/logs/stdout.log
Completed.......
缩容集群
- 使用
spex cluster stop --name <cluster-name> --host <host-ip>停止指定节点。
示例: 在 demo 集群缩容 IP 为 10.0.1.2 的 ShardingSphere-Proxy 节点。
[root@centos71 ~]# spex cluster stop --name demo --type proxy --host 10.0.1.2
Operation ShardingSphere-Proxy
stop proxy
10.0.1.2 : 3388 => success
Stopping the ShardingSphere-Proxy
STOPED PID:29550 PORT:3388
Completed......
FAQ
如何配置 Python 环境变量?
安装 Python 时,需要配置 Python 的 bin 目录到 PATH 环境变量中。这样才可以使用所安装的 Python 中的 pip 安装 SphereEx-Boot 工具。
比如: export PATH=/usr/local/python3/bin:$PATH 追加到 ~/.bashrc 文件末尾。并执行 source ~/.bashrc 使环境变量生效。
如何查看依赖软件版本?
- 执行命令
sshpass -V可以查看 sshpass 版本。
Bash$ sshpass -V sshpass 1.06
- 执行命令
python -V可以查看 Python 版本。
Bash$ python -V Python 3.6.8
- 执行命令
pip --version可以查看 pip 版本。
Bash$ pip --version pip 21.3.1 from /usr/local/lib/python3.6/site-packages/pip (python 3.6)
- 如果 pip 版本过低,可以使用
pip install --upgrade pip命令升级 pip,如果升级不成功,请重新安装 pip。
如何安装 pip 包?
- Python3 环境安装 pip
wget https://bootstrap.pypa.io/get-pip.py
python get-pip.py 或者 python3 get-pip.py
- Python2 环境安装 pip
wget https://bootstrap.pypa.io/pip/2.7/get-pip.py
python get-pip.py
如何配置 SSH 互信?
设置密钥免密登录(已设置密钥免登录可跳过如下步骤)
- 生成密钥(如果
~/.ssh/目录下已存id_rsa.pub文件可以跳过)
Bash$ ssh-keygen -t rsa
- 设置互信
ssh-copy-id -i ~/.ssh/id_rsa.pub <user>@<host-ip>
Bash$ ssh-copy-id -i ~/.ssh/id_rsa.pub root@127.0.0.1